Weird soviet VISE RESTORATION
Оригинал видео:
Все права на это видео принадлежат автору канала:
A few weeks ago I bought this cute little vise to use on my projects since I typically work on small items. I think it’s a jeweler’s vise but I have no idea who made it and when. This is much more practical for small projects than the big vise you’ve seen me use. Doing my squeeze lighter restoration I however ran in a problem with the dents in the anvil part of the vise. The dents caused the other side of the rivets I was hammering to deform which doesn’t look good although it has no affect to the practicality of the rivets. So I decided I should probably do complete restoration since the jaws are also pretty worn out. More info can be found after the links. Thanks for watching and remember to subscribe!
---------------------------------------------------------------------
Check out my new Instagram:
Support me on Patreon:
SOME OF MY TOOLS:
RUST REMOVER:
SANDING PADS:
SCREW DRIVER SET:
SCORLL SAW:
POWER FILE:
CHUCK NORRIS’ TOOTHBRUSH:
CORDLESS DRILL:
BETTER ROTARY TOOL:
PRESS FOR ROTARY TOOL:
2-AXIS TABLE FOR THE PRESS
MY FILMING GEAR:
MAIN CAMERA:
MAIN TRIPOD:
MICROPHONE:
VIDEO LIGHTS:
MAIN LENS:
CINEMATIC LENS:
WIDE ANGLE LENS:
GOPRO:
THE WATCH:
---------------------------------------------------------------------
SUBSCRIBE ▶▶▶
---------------------------------------------------------------------
Restoration playlist▶
---------------------------------------------------------------------
I started the project by removing rust and old paint. I removed the paint first because I didn’t want to get too much paint into my rust remover. I’m unsure if there are other reasons to do one before the other.
After removing the rust I had 3 things I wanted to do for the vise. 1. Fix and polish the mutilated areas on top of the jaws and on the surface on the anvil. 2. Restore the jaws 3. Straighten the bent metal handle and round plate used to attach the vise to the table.
For the first task I used a file until all the dents were gone then I sanded with papers and sanding pads through grits 400, 800, 1500, 2000, 3600, 8000, 12000. This took probably a full workdays worth of time. Then I buffed the surfaces with wool wheel and metal polishing compound. But as you can see the results are worth it. This is probably the polishing job I’ve done. It’s just impossible to keep/get those mirror polished surfaces completely free from grease for nice video.
For the second task I used 2 mini files I had. I was lucky there was parts of the old lines left on the jaws. I used those as guides and refiled all the teeth back in there. I had to eyeball few of the lines near the corners because there was nothing left to use as a guide. This took me maybe 3-4 hours. Now the vise grips like brand new. I still need to make some rubber covers for the jaws for projects which I don’t want to damage with the teeth.
The third task doesn’t need much explanation. The reason I used the socket as base when hammering the plate was to curve the edge so that the plate grips with the edge too rather than only with the middle part.
For the looks I decided to go with this “firetruck” look. I thought red would look nice with the polished parts but I also wanted to have protect the screws from rust with the gun blue solution. I fell black would have looked a bit boring and red seemed to work best with both polished and black steel. I used the fake hammerite product. It’s better available locally that the original but should work as well. I had never tried this sort of paint so I was eager to test it and this seemed like the project to do that. One of the reasons I do these projects is to learn and the only way to learn is to try new things. Overall, I’m super happy with how it turned out. One of my best, both the video and the product. Well see how well the paint will last because I will definitely use this. I can always re-restore it ;)
00:11:39
Климатическое оружие - рассекреченные проекты СССР.
Климатическое оружие - рассекреченные проекты СССР. смотреть онлайн
00:13:00
My Russian Apartment Tour: GREY SOVIET BUILDINGS EXPLAINED!
My Russian Apartment Tour: GREY SOVIET BUILDINGS EXPLAINED! смотреть онлайн
00:00:55
What are These WEIRD Russian Flags in Ukraine??
What are These WEIRD Russian Flags in Ukraine?? смотреть онлайн
00:23:21
Kleincomputer KC 85/3: Part 1 (First look)
Kleincomputer KC 85/3: Part 1 (First look) смотреть онлайн
00:00:32
POLIZEI HAS AN ARMY OF STASI WHO ARE GOING TO KILL ME
POLIZEI HAS AN ARMY OF STASI WHO ARE GOING TO KILL ME смотреть онлайн
00:00:02
TE POLIZEI IS WATCHING EVRYTHIN IN I POST AND AM HUNTED STREET BY BY STREET 8 YEARS AFTER WORKING SAP SKY DEUTSCHLAND
TE POLIZEI IS WATCHING EVRYTHIN IN I POST AND AM HUNTED STREET BY BY STREET 8 YEARS AFTER WORKING SAP SKY DEUTSCHLAND смотреть онлайн
00:12:59
SU-35S at Paris Le Bourget 2013 [Remastered] - HD 50fps
SU-35S at Paris Le Bourget 2013 [Remastered] - HD 50fps смотреть онлайн
00:10:25
Could Godzilla defeat the Titan HUNTER? | Titan Hunter MECH Explained
Could Godzilla defeat the Titan HUNTER? | Titan Hunter MECH Explained смотреть онлайн
03:46:39
PSX Longplay [289] Nuclear Strike
PSX Longplay [289] Nuclear Strike смотреть онлайн
00:00:42
Meet the Weird Versions of Vehicles Part 3
Meet the Weird Versions of Vehicles Part 3 смотреть онлайн
01:17:06
The Rise & Fall Of Rokapops
The Rise & Fall Of Rokapops смотреть онлайн
00:22:16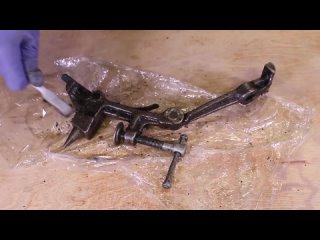
Weird soviet VISE RESTORATION
Weird soviet VISE RESTORATION смотреть онлайн
00:58:18
U18 1978 Ice Hockey European Championship final game: Finland-USSR
U18 1978 Ice Hockey European Championship final game: Finland-USSR смотреть онлайн
00:00:58
REKA - Trailer
REKA - Trailer смотреть онлайн
00:03:23
REKA - Walkthrough
REKA - Walkthrough смотреть онлайн
00:02:55
2010 medvedev and putin cartoon song dancing with english subtitles BEST
2010 medvedev and putin cartoon song dancing with english subtitles BEST смотреть онлайн
00:17:33
Soup Need Donuts - Weird Disturbing Memes From DeepWeb Watch Online (FULL ALBUM)
Soup Need Donuts - Weird Disturbing Memes From DeepWeb Watch Online (FULL ALBUM) смотреть онлайн
00:17:20
Makarov: The Soviets Adopt Some Weird Proprietary Caliber
Makarov: The Soviets Adopt Some Weird Proprietary Caliber смотреть онлайн
00:02:30
APOLLO 18. Official Trailer.
APOLLO 18. Official Trailer. смотреть онлайн
00:02:14
WTF? Old lady with Soviet flag mistakes Ukrainian soldiers for Russians, soldier makes fun of her?
WTF? Old lady with Soviet flag mistakes Ukrainian soldiers for Russians, soldier makes fun of her? смотреть онлайн
00:11:40
Putin’s Secret Neo-Nazi Armies | Decade of Hate
Putin’s Secret Neo-Nazi Armies | Decade of Hate смотреть онлайн
00:13:26
Why Soviet Bus Stops Look Weird
Why Soviet Bus Stops Look Weird смотреть онлайн
00:16:48
Venera: The Russian Probe on the Hellscape of Venus
Venera: The Russian Probe on the Hellscape of Venus смотреть онлайн
00:11:17
The Stomach-Churning Things Stalin Did To Gulag Prisoners
The Stomach-Churning Things Stalin Did To Gulag Prisoners смотреть онлайн